-
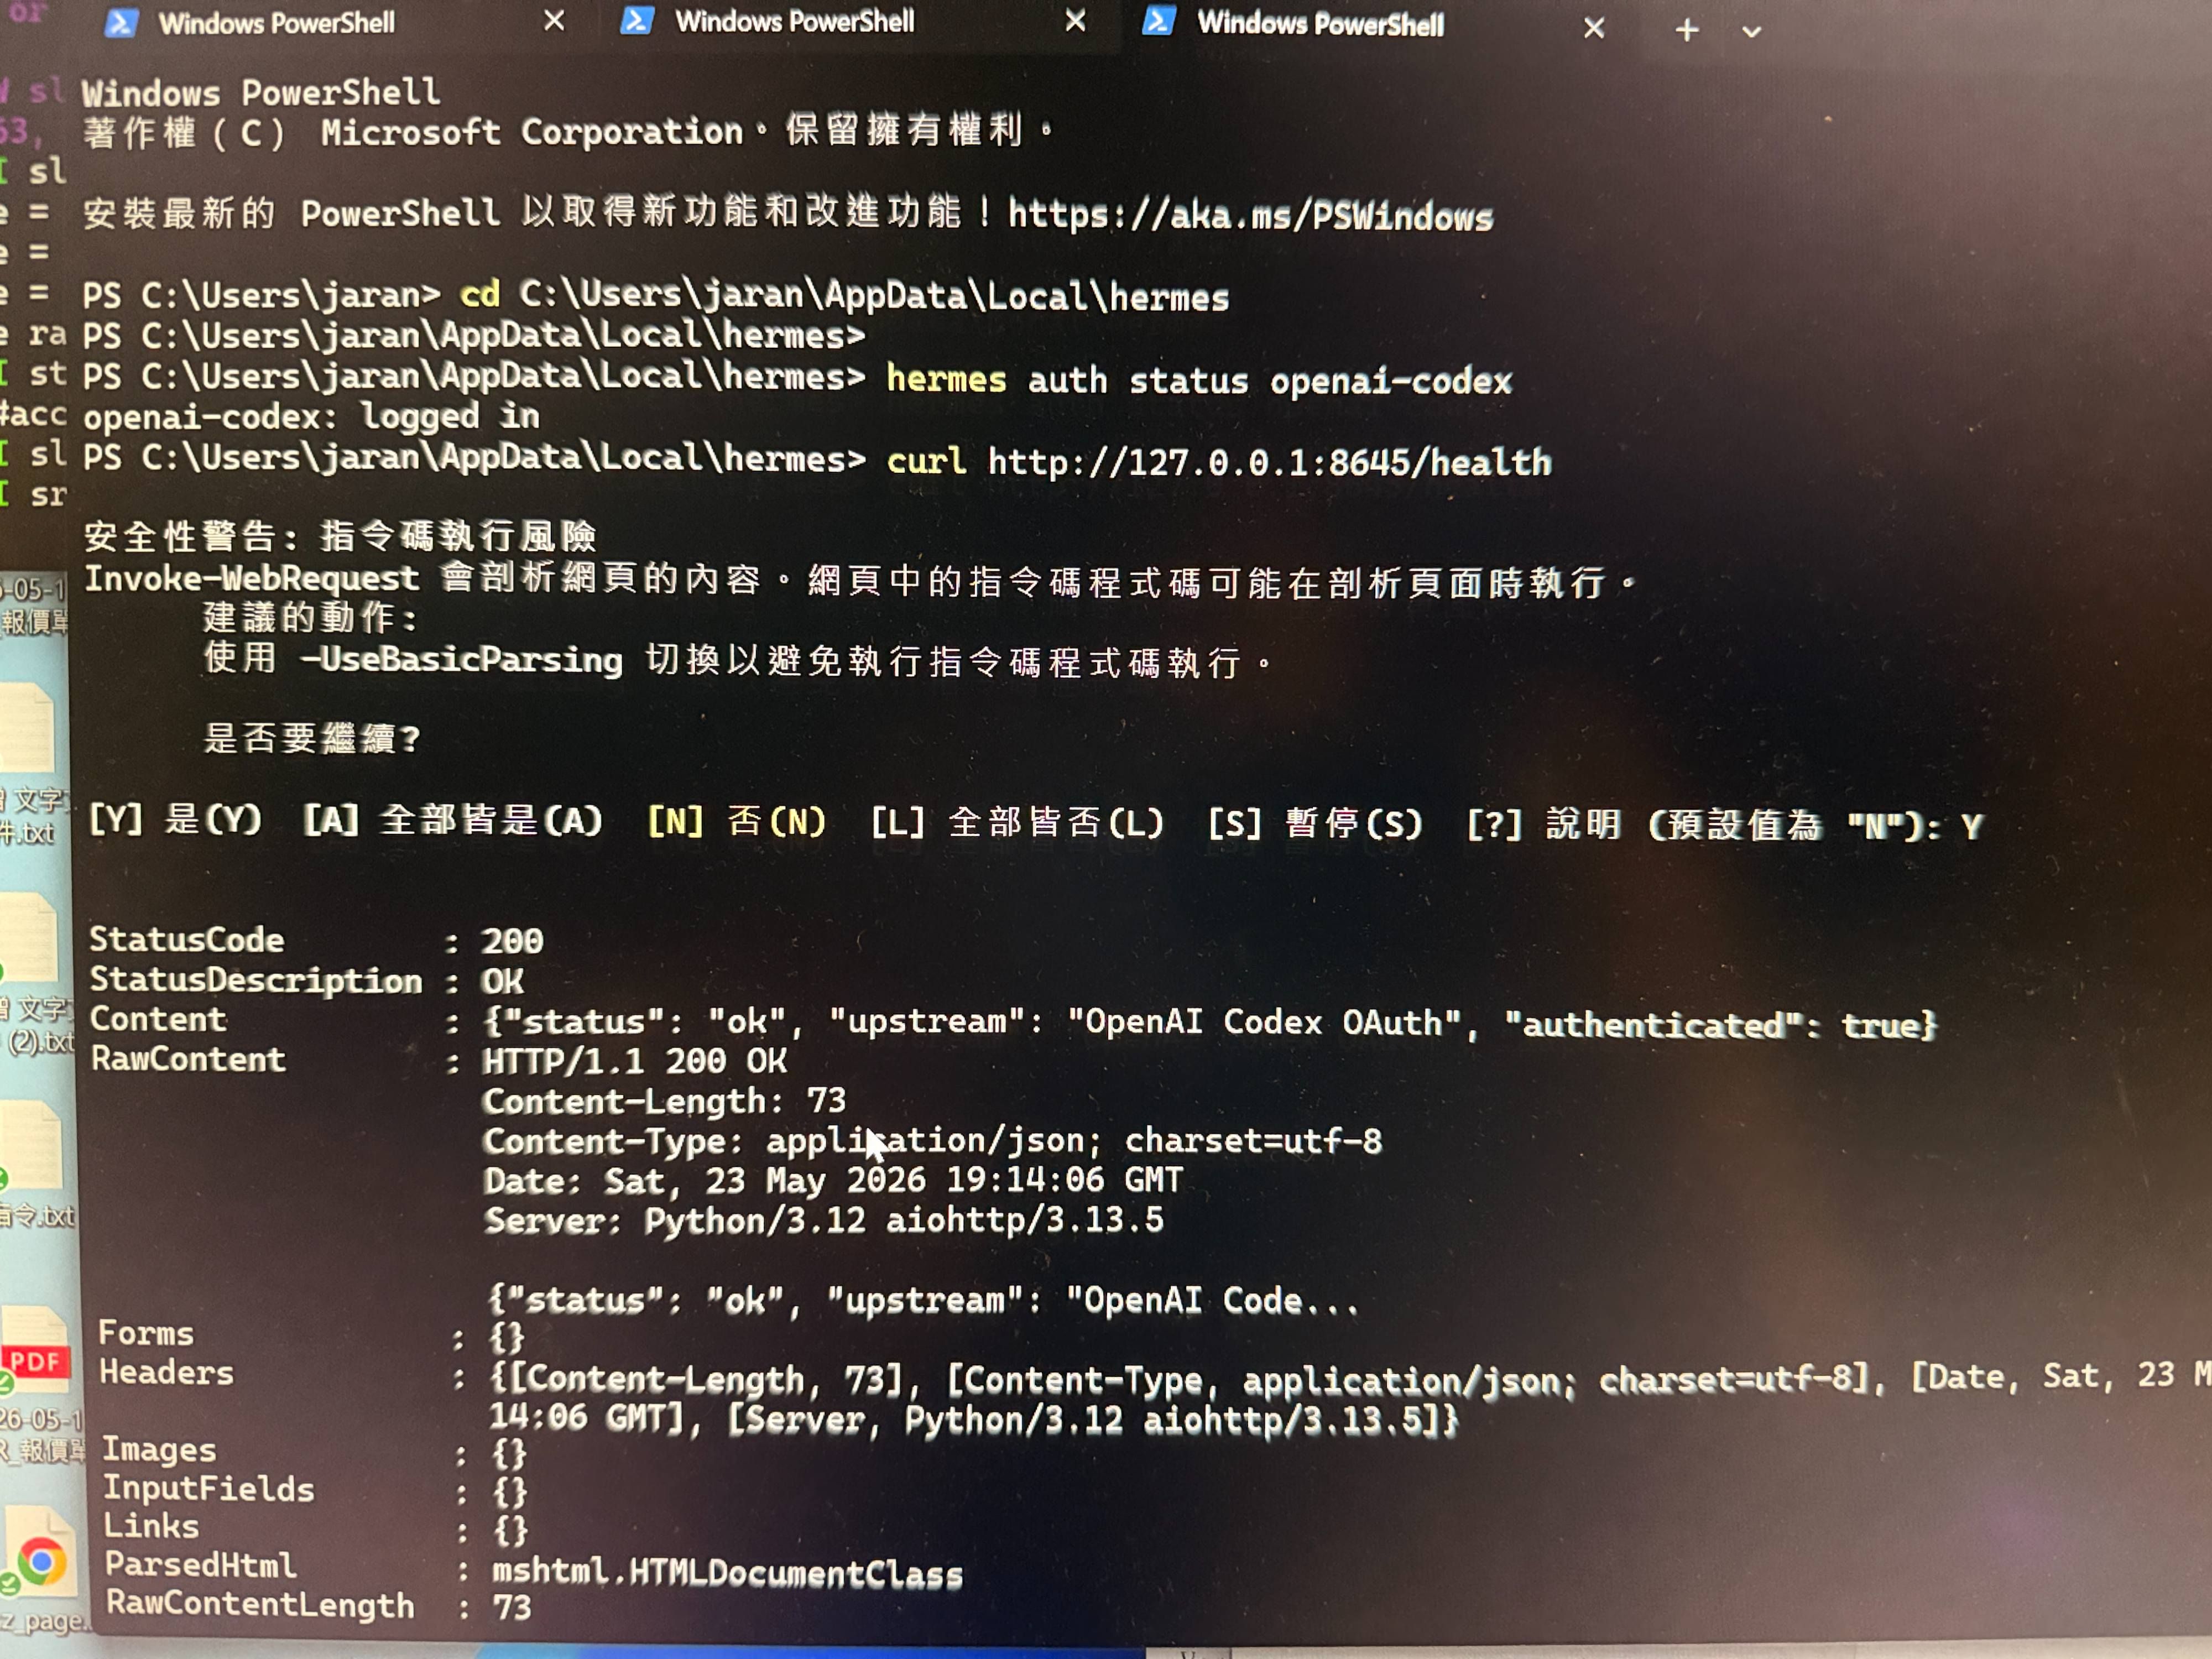
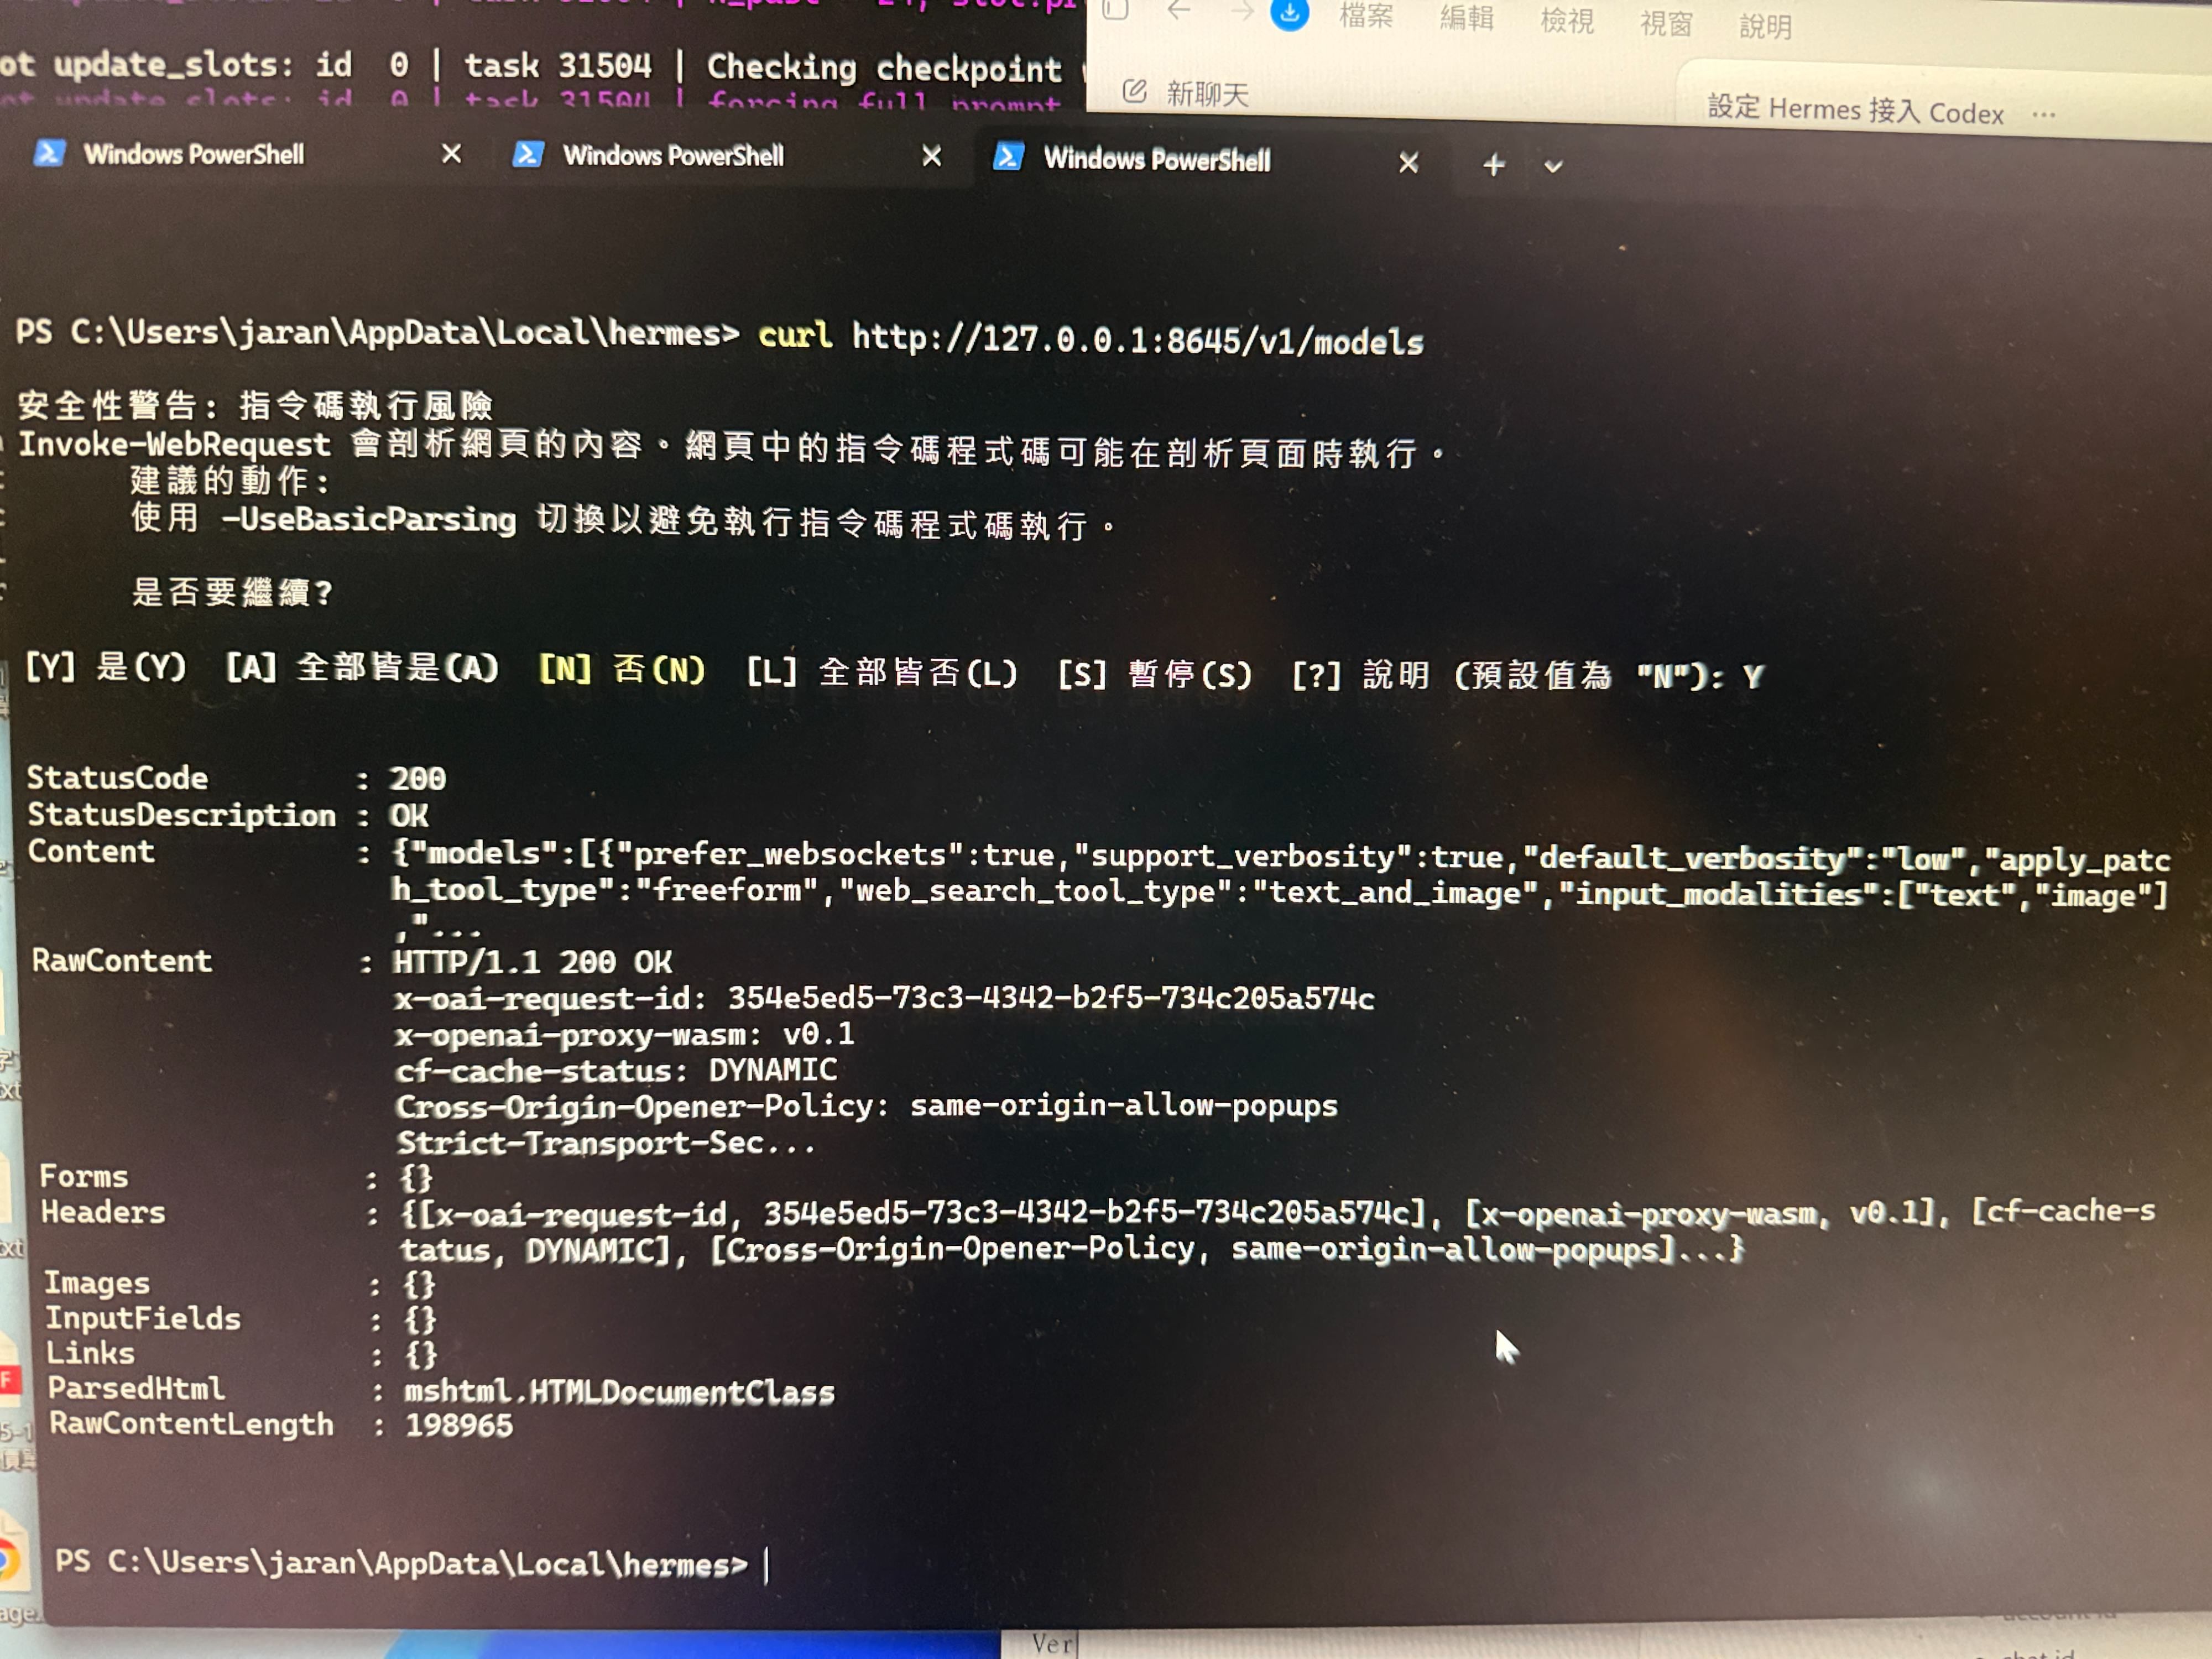
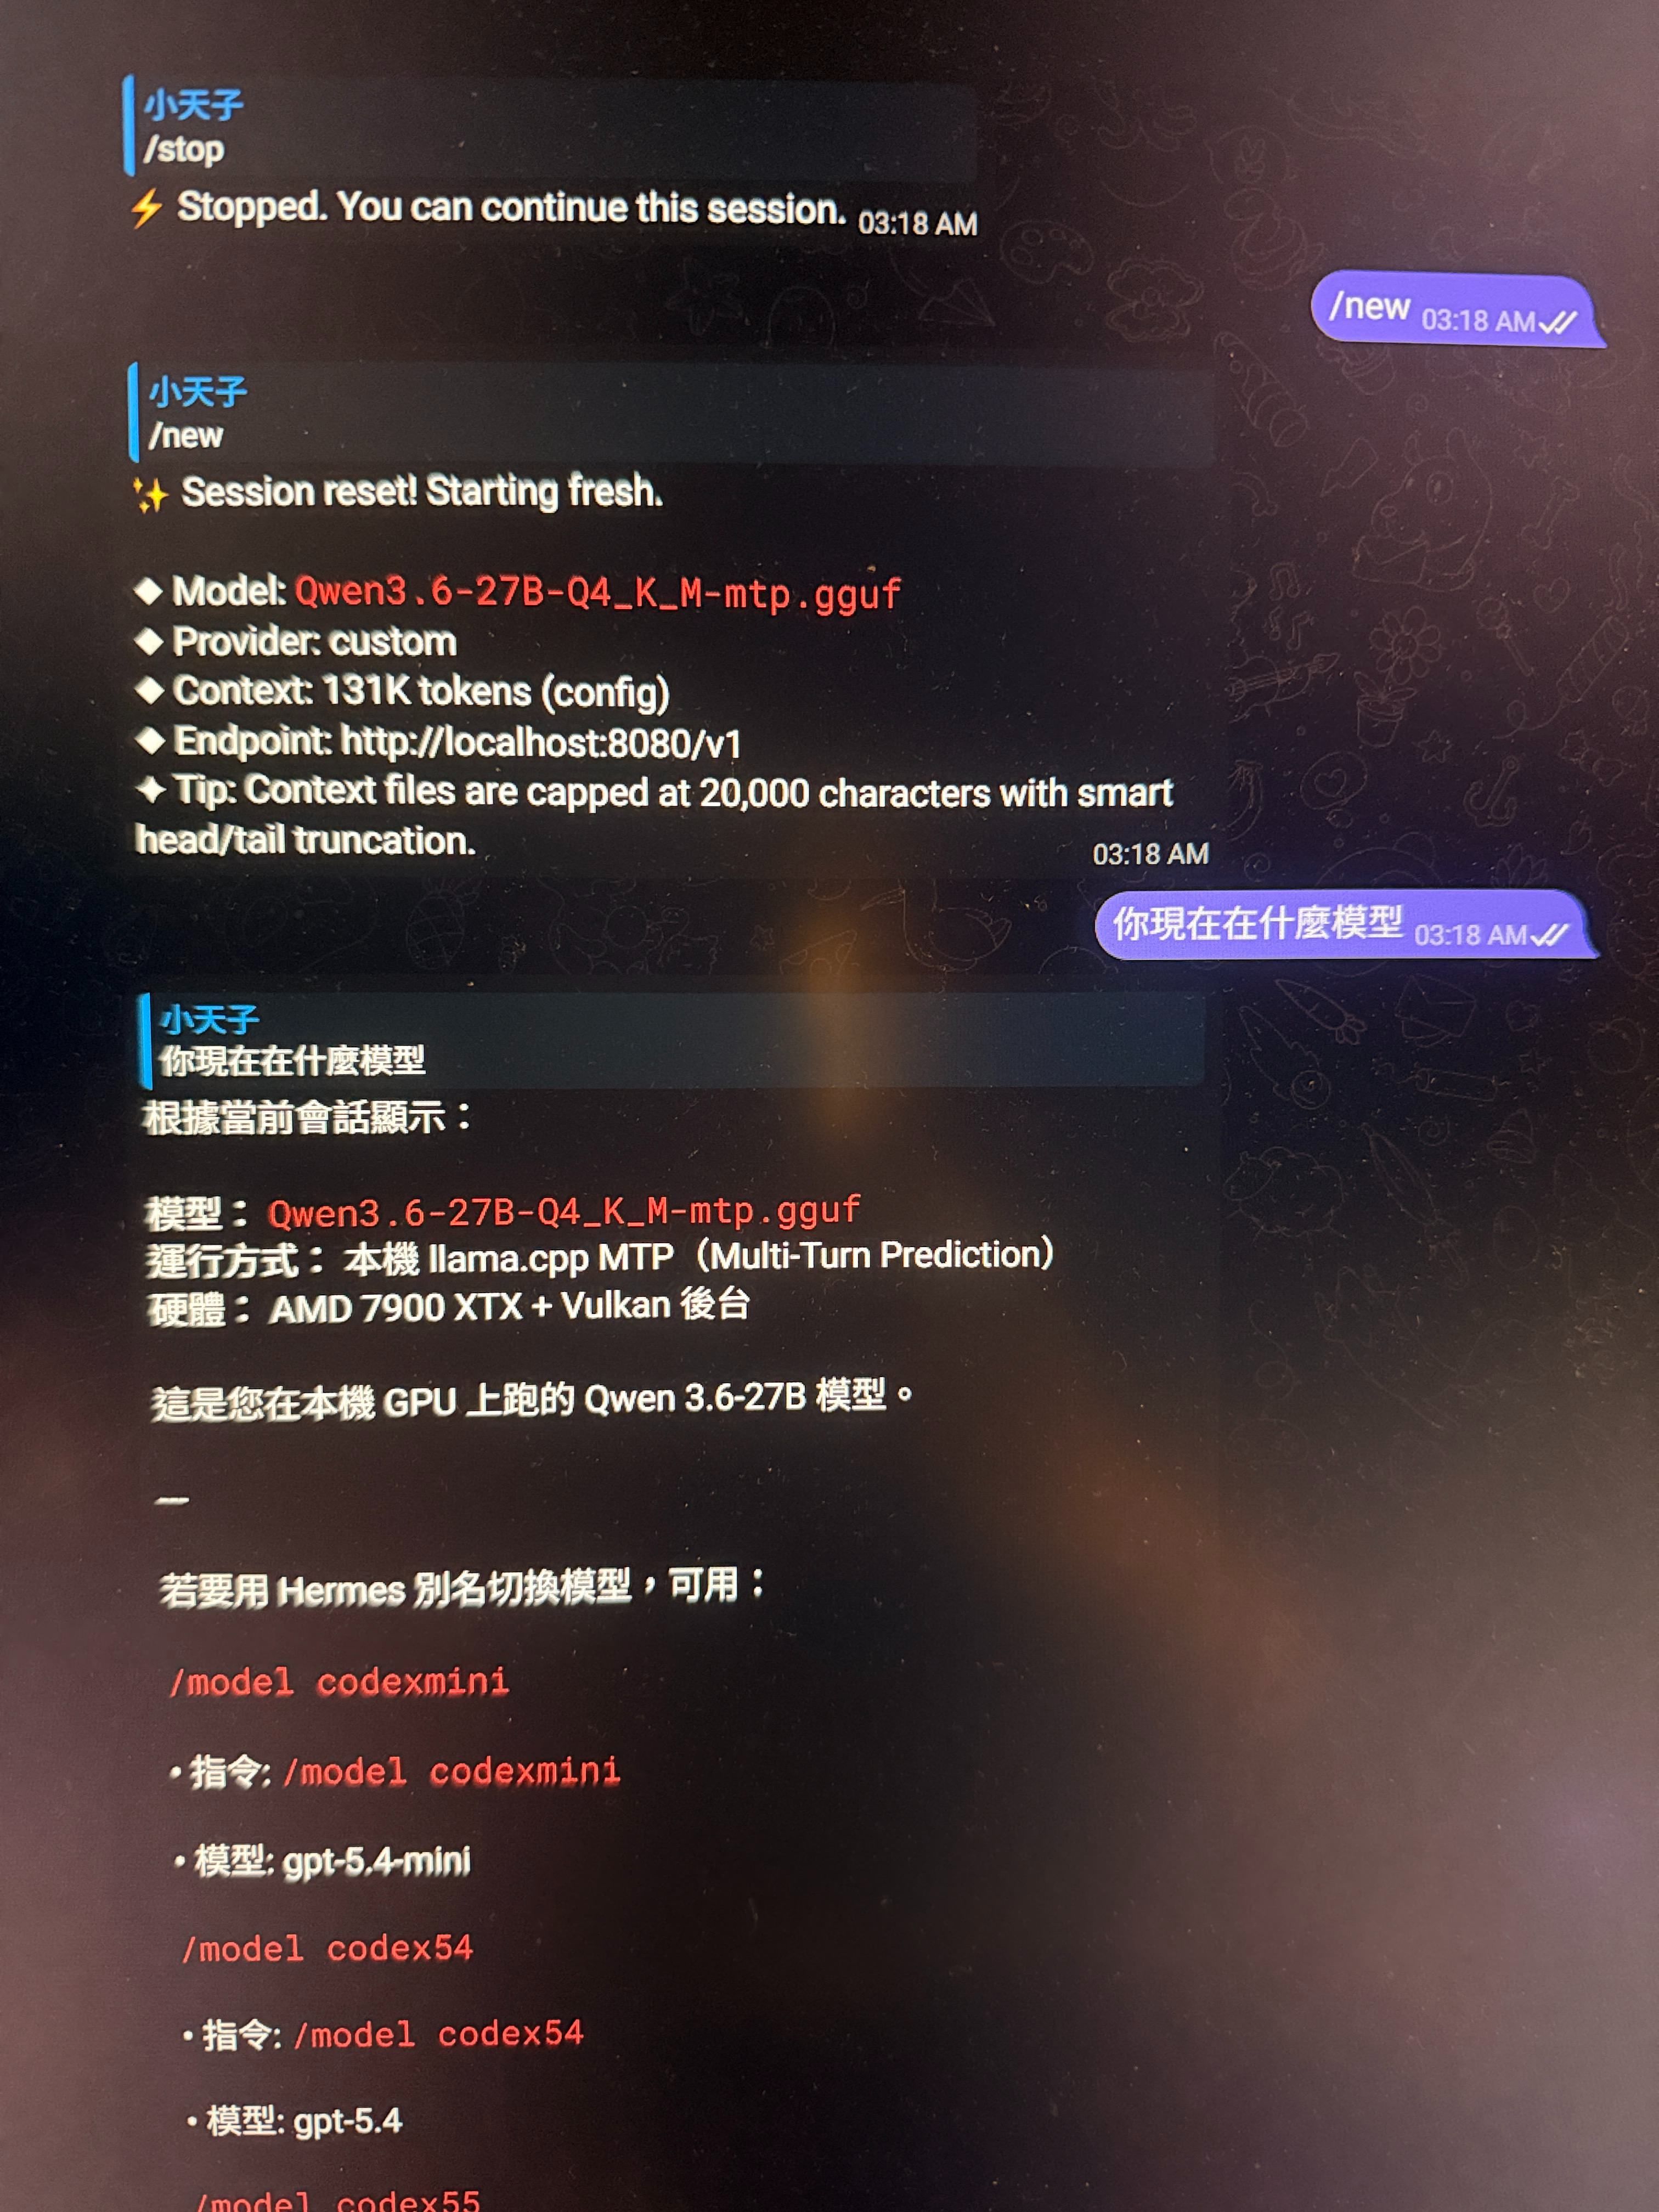
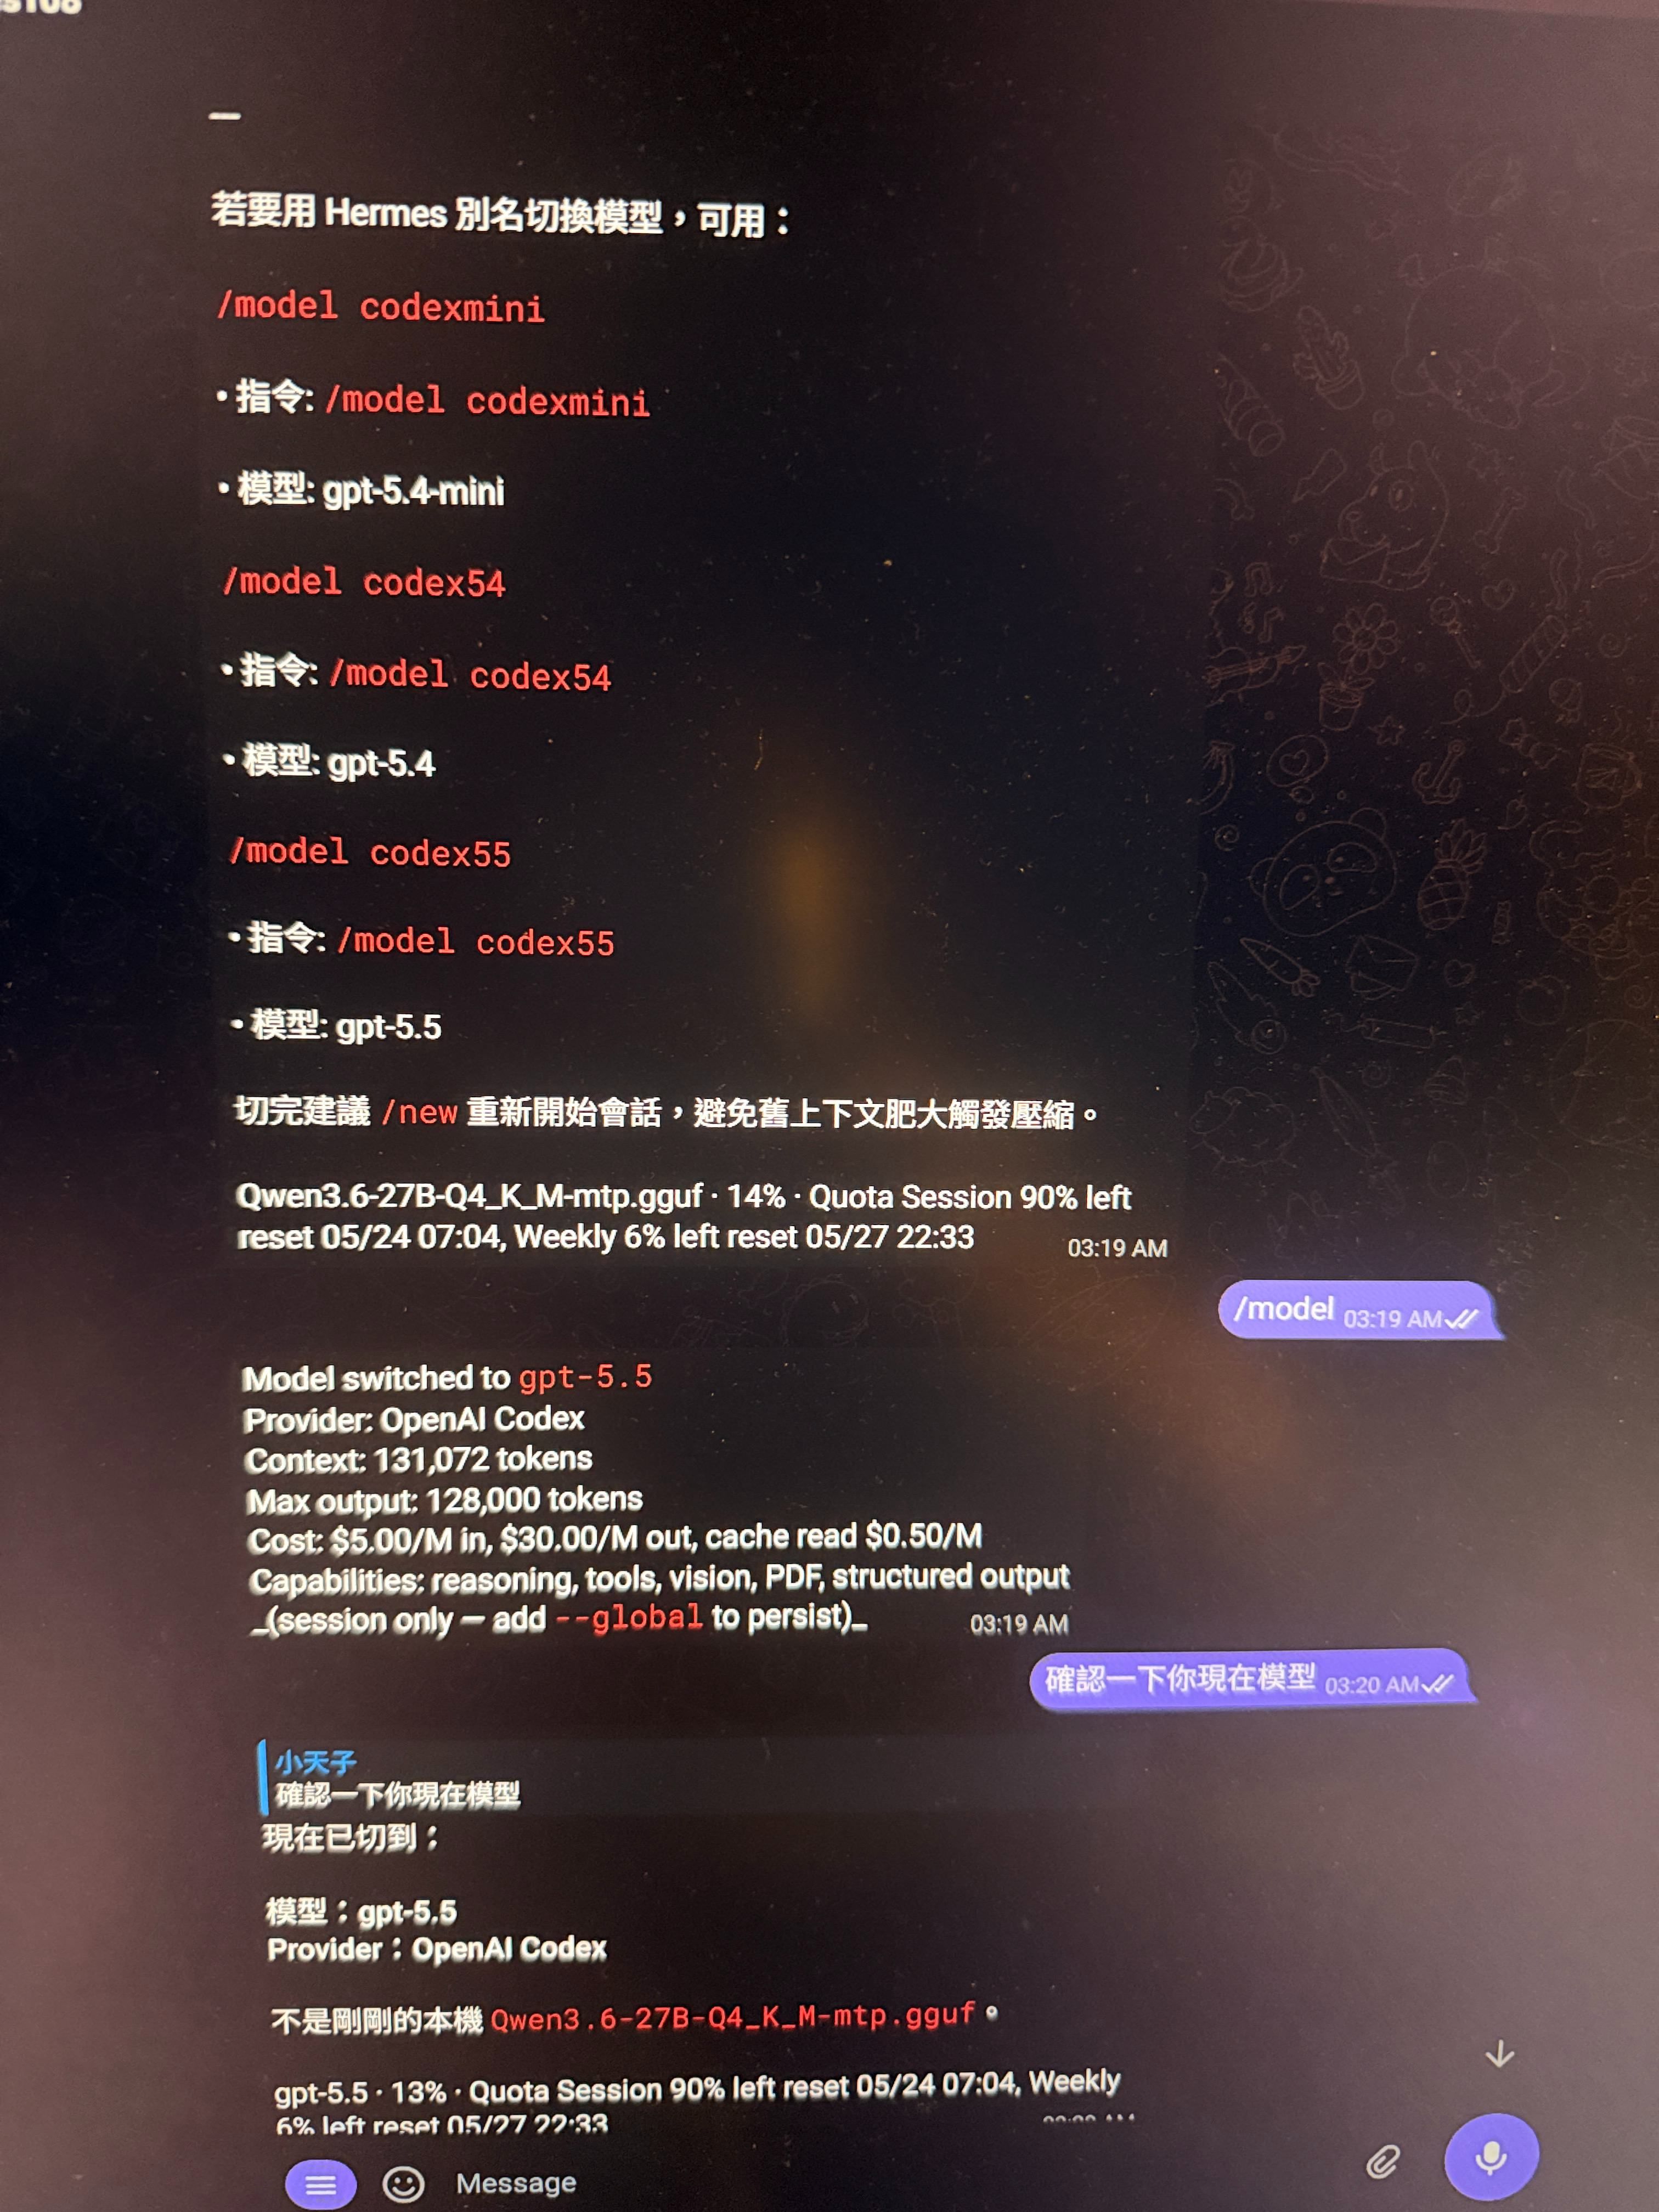
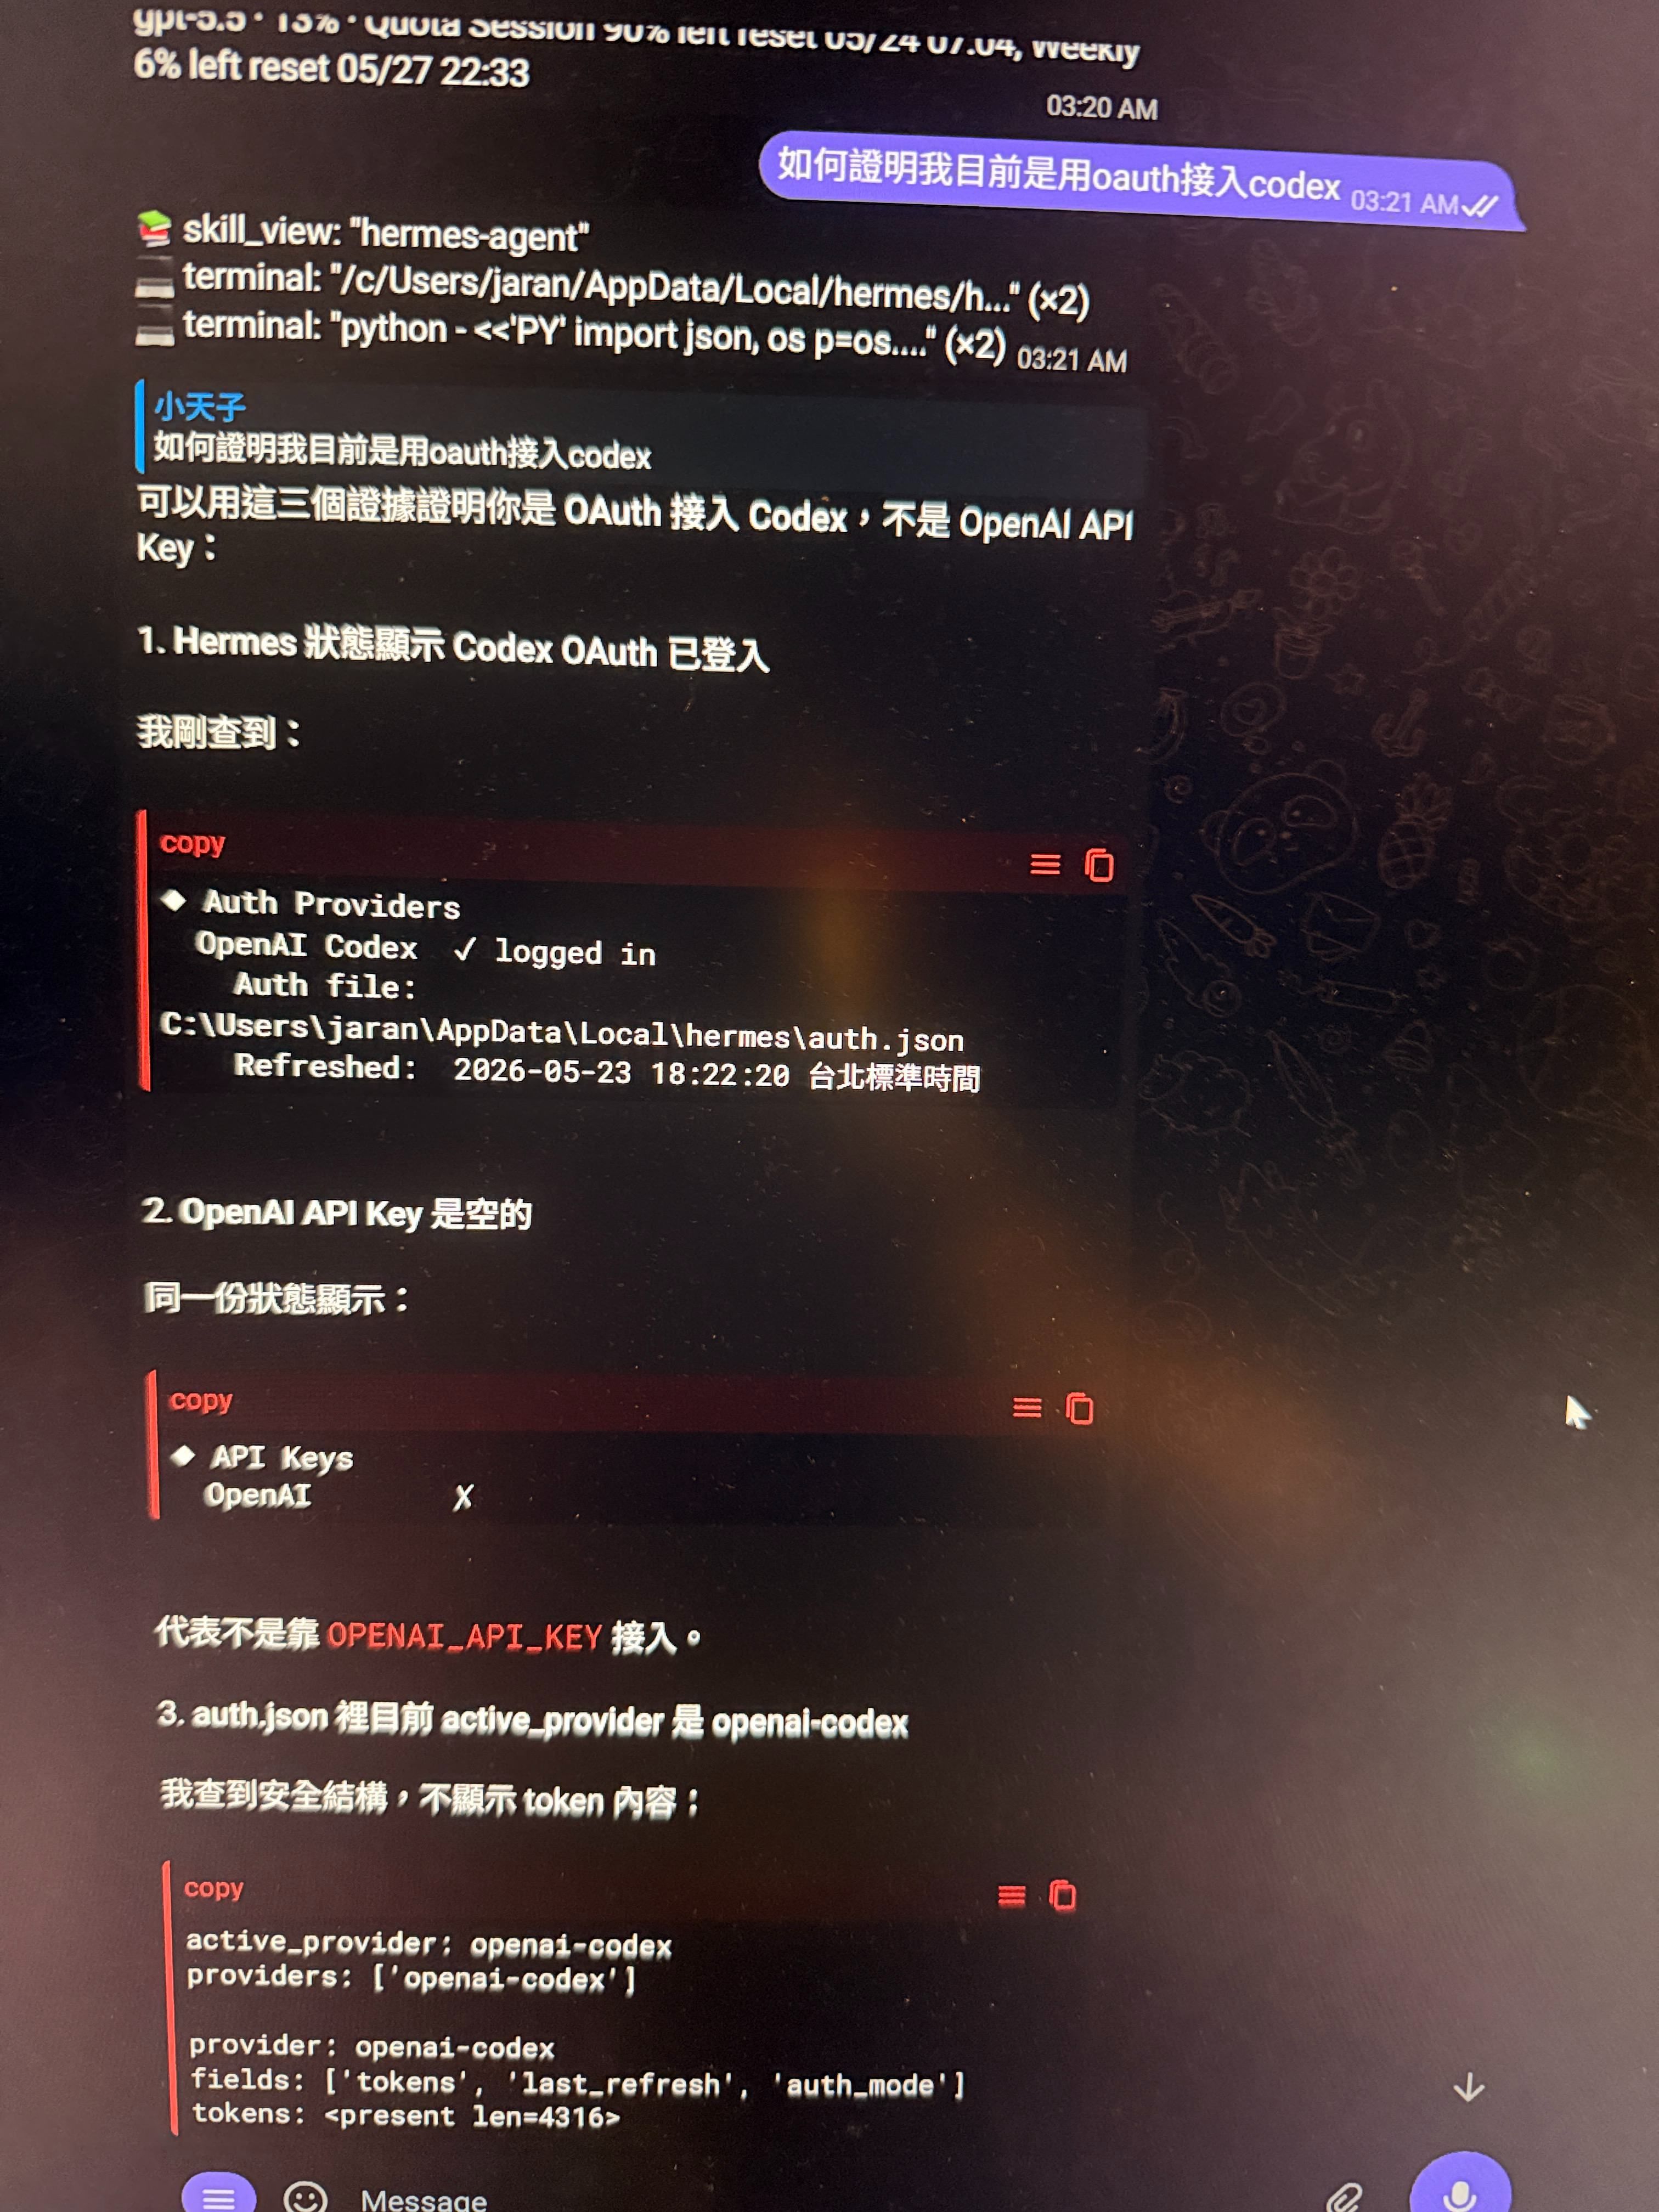
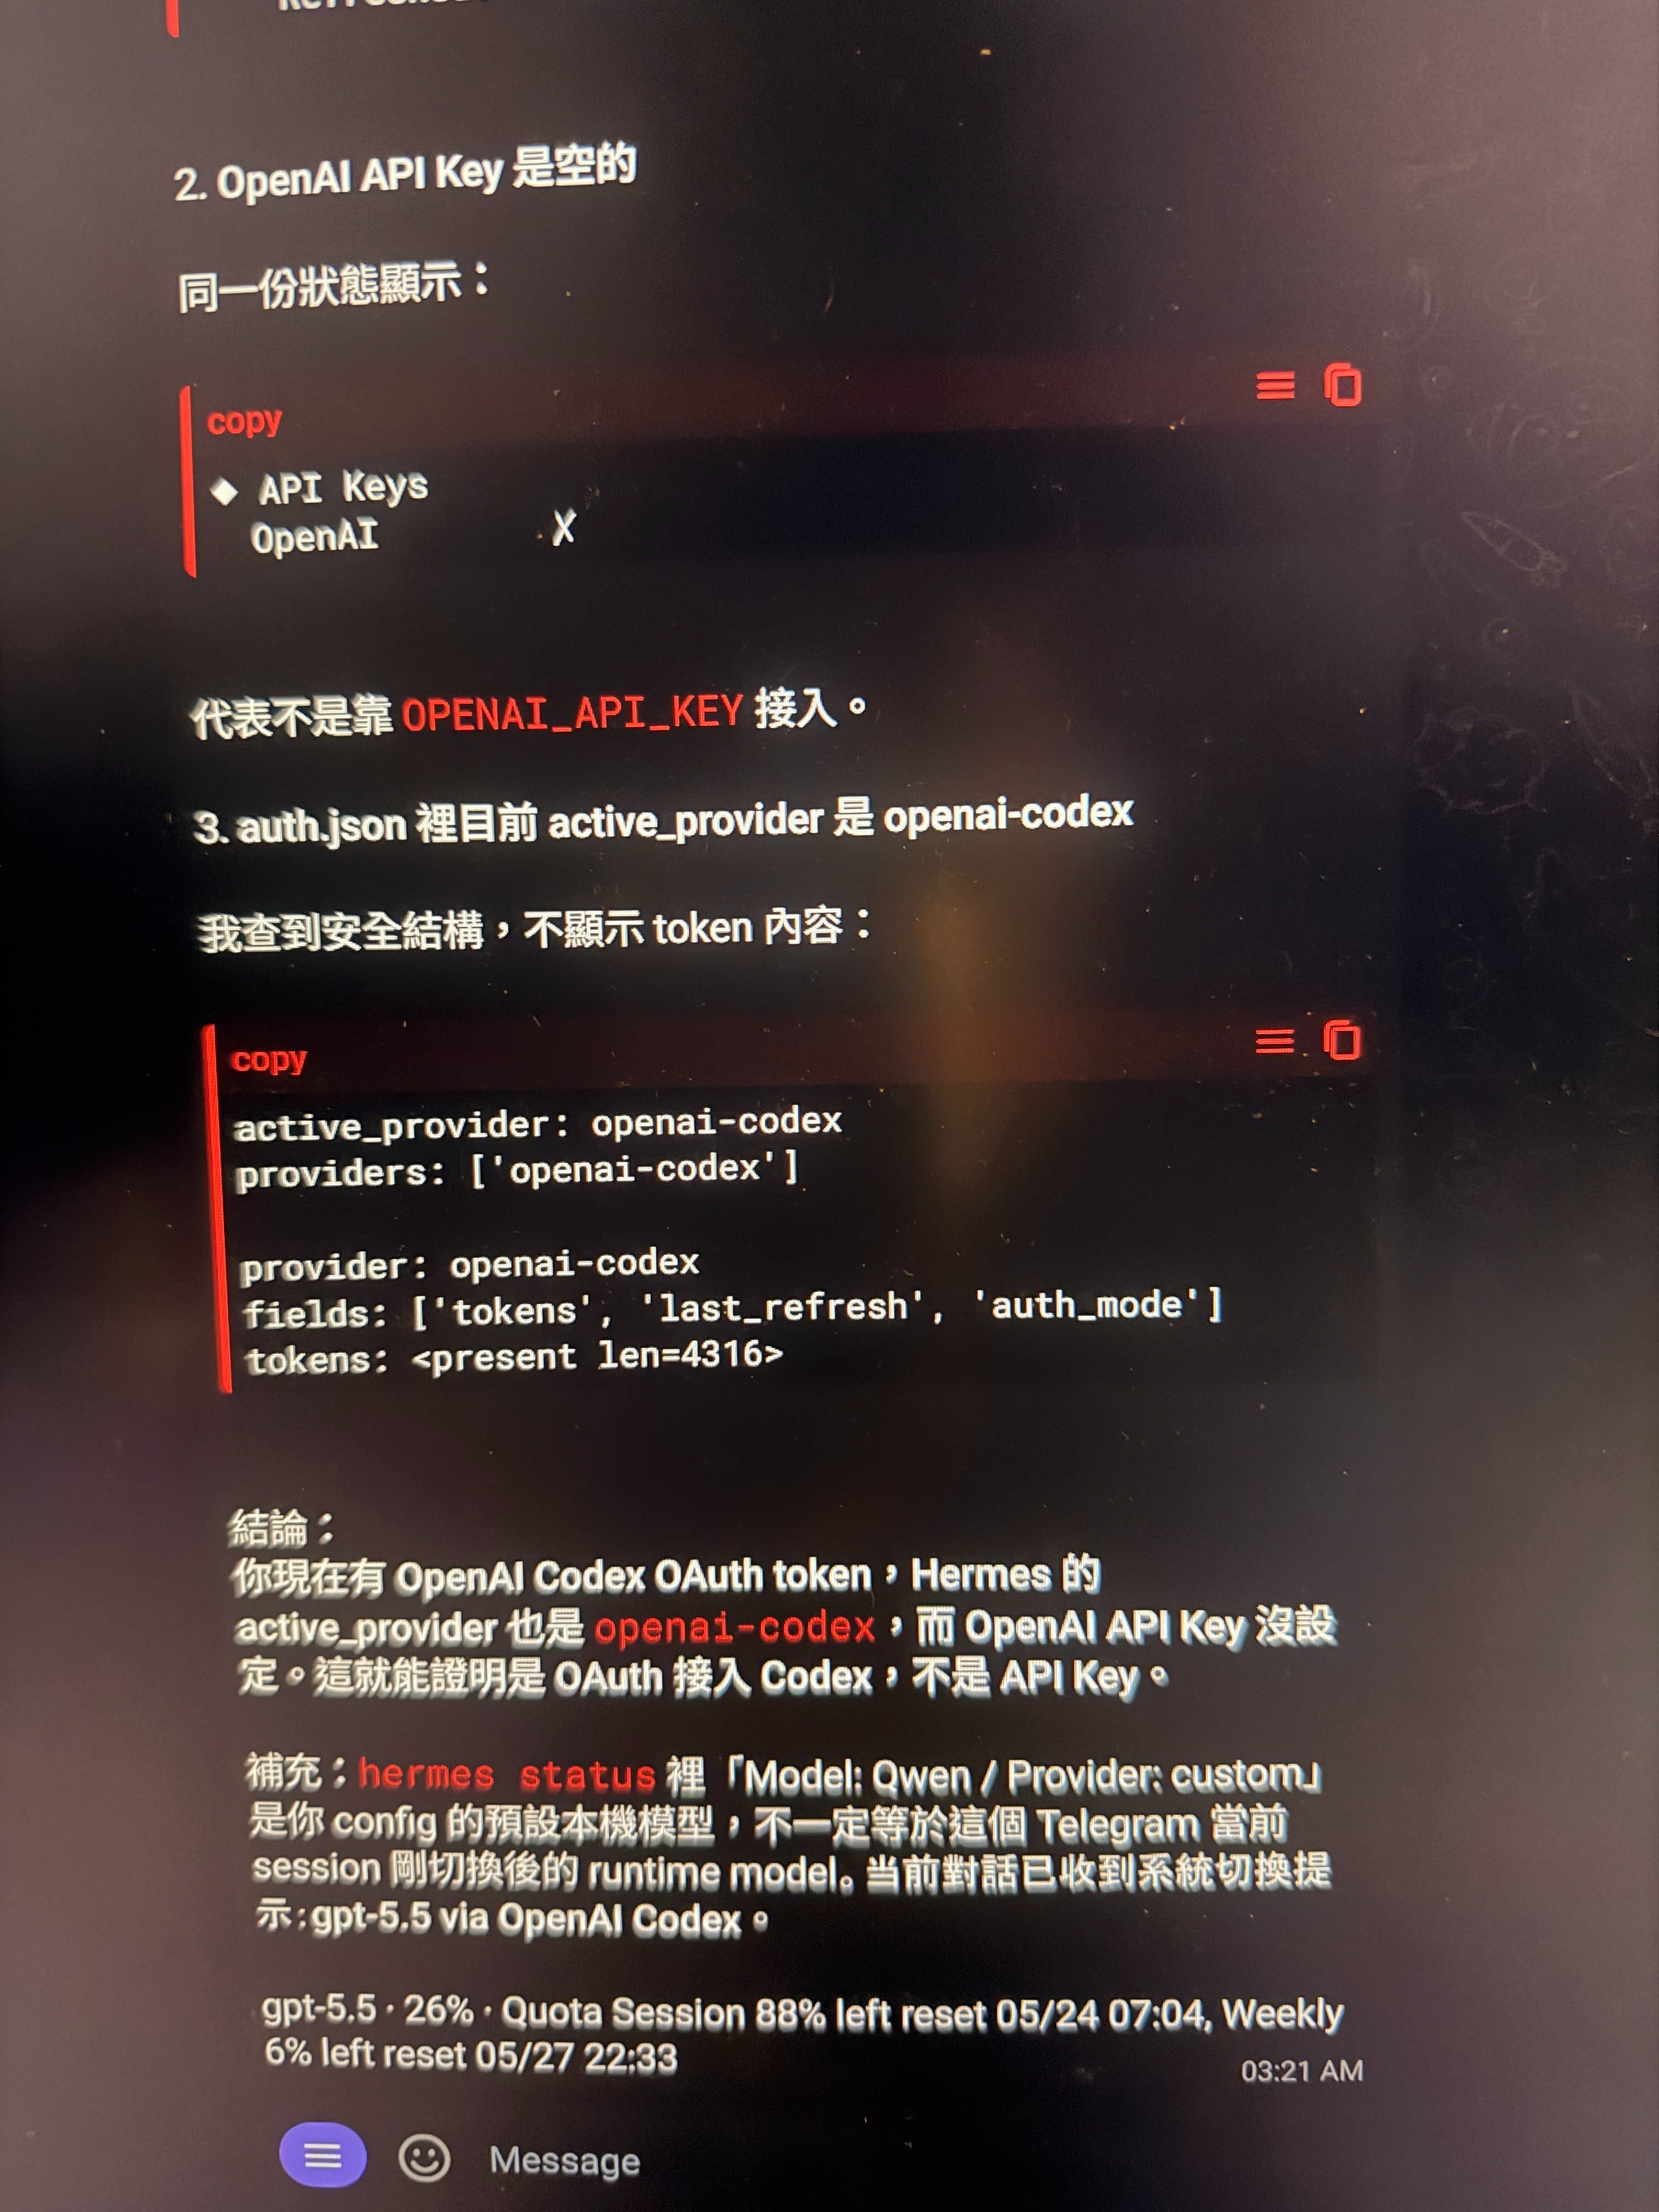 用codex實作成功後 請他整理的~分享給大家
截至 2026-05-23,Hermes 官方文件已明確支援:
xai-oauth:SuperGrok / X Premium+
openai-codex:ChatGPT OAuth
anthropic:Claude OAuth
但要注意一個關鍵差異:
官方文件寫的是 Claude OAuth 需要 Claude Max + extra usage credits,不是 Claude Pro。
Hermes 接入 Codex OAuth、串 Telegram 與本地 Qwen 實戰筆記
更新日期:2026-05-23以下本篇開始
Hermes 接入 Codex OAuth、串 Telegram 與本地 Qwen 實戰筆記
(chatgpt plus可調用API給hermes)平常用qwen3.6 27b 遇到坎改codex,
這篇是我在 Windows 上實際把 Hermes 串上本地 llama.cpp Qwen 模型、OpenAI Codex OAuth,以及 Telegram Gateway 的完整紀錄。主題分成兩段:怎麼把 Codex 的 OAuth 設進 Hermes
串完之後,怎麼跟本地 Qwen、Telegram 一起穩定工作
重點不是只有「能不能跑」,而是把中間最容易卡住的地方也一起講清楚。這篇最核心要解的是什麼
我一開始真正要做的事其實很單純:把 ChatGPT / Codex 的 OAuth 接進 Hermes
然後讓 Hermes 能同時做到:提供 Codex 模型給 Hermes 自己使用
提供本地 OpenAI-compatible proxy 給其他工具使用
保留本地 Qwen,不要被 Codex 蓋掉
讓 Telegram 裡能手動切換本地模型和 Codex
所以如果你只是想看「Codex OAuth 怎麼設進 Hermes」,先看下面這段就夠。最短教學:怎麼把 Codex OAuth 設進 Hermes
- 先確認 Hermes 版本
至少先升到較新的版本,我這次成功環境是:
Hermes v0.14.0
可以先查:hermes --version
2. 用 Hermes 登入 OpenAI Codex
最直接有兩種做法。方法 A:
hermes model
在 provider 清單裡選:OpenAI Codex
方法 B:hermes auth add openai-codex
3. 登入完先查狀態
hermes auth status openai-codex
hermes status
正常時會看到:OpenAI Codex logged in
4. 啟動 Hermes Proxy
hermes proxy start --provider openai-codex
成功後通常會提供:http://127.0.0.1:8645/v1
5. 驗證 Proxy
curl.exe -i -H "Authorization: Bearer sk-unused" http://127.0.0.1:8645/health
curl.exe -i -H "Authorization: Bearer sk-unused" http://127.0.0.1:8645/v1/models
如果成功,代表:Hermes 已拿到 Codex OAuth
Hermes Proxy 已能代轉給 Codex
6. 接到其他工具
其他支援 OpenAI-compatible 的工具就填:Base URL: http://127.0.0.1:8645/v1
API Key: 任意非空字串,例如 sk-unused
Model: gpt-5.5
目標
我最後要達成的是這個完整配置:本地主模型:Qwen3.6-27B-Q4_K_M-mtp.gguf
本地推理:llama-server 跑在 http://127.0.0.1:8080/v1
Hermes Gateway:接 Telegram
Hermes Proxy:提供 OpenAI-compatible 端點給 Codex OAuth
Telegram 內可隨時切換:
/qwen
/qwenmtp
/codex
我的環境
Windows 11
Hermes v0.14.0
llama.cpp / llama-server
本地模型:Qwen3.6-27B-Q4_K_M-mtp.gguf
最後成功的架構- 本地 Qwen
llama-server 提供:
http://127.0.0.1:8080/v1
Hermes 的全域預設模型最後設成:model:
default: Qwen3.6-27B-Q4_K_M-mtp.gguf
provider: custom:local-q4k_m-(主模型)
base_url: http://localhost:8080/v1
這樣 Telegram 開新 session 或 /new 之後,預設會回到本地 Qwen,不會誤跳到 Codex。- Codex Proxy
Hermes Proxy 成功後提供:
http://127.0.0.1:8645/v1
工具端要填:Provider: OpenAI-compatible / Custom OpenAI
Base URL: http://127.0.0.1:8645/v1
API Key: 任意非空字串,例如 sk-unused
Model: gpt-5.5
一開始遇到的坑
坑 1:Hermes 升級後,openai-codex proxy 不是直接可用
雖然 Hermes 新版已經有 OpenAI Codex provider,但當時 proxy 這條沒有完整對上,所以需要補上 openai-codex adapter 才能讓:hermes proxy start --provider openai-codex
正常工作。補完後可以驗證:
curl.exe -i -H "Authorization: Bearer sk-unused" http://127.0.0.1:8645/health
curl.exe -i -H "Authorization: Bearer sk-unused" http://127.0.0.1:8645/v1/models
/health 回 authenticated: true,/v1/models 能列出 gpt-5.5 才算通。坑 2:Telegram /new 之後一直跳回 Codex
這不是 Telegram 壞掉,而是 Hermes 全域預設模型原本還是:gpt-5.5 / openai-codex
所以:/qwenmtp 只是 session only
一旦 /new
就又回到全域預設
解法是把全域預設改回本地 Qwen MTP。坑 3:/codex 顯示切換成功,但一問就 429
這個最容易誤判。一開始看到:
Model switched to gpt-5.5
Provider: OpenAI Codex
很像成功,但實際一發問就出現:The model provider is rate-limiting requests.
HTTP 429: The usage limit has been reached
一開始以為是:Hermes 選錯 credential
或舊 token 被標成 exhausted
後來實際解 JWT 才發現真正原因。最關鍵的真相:Hermes 當時吃到的是 free token,不是 Plus
雖然我登入的 ChatGPT 帳號本身是 Plus,但 Hermes auth add openai-codex 當時拿到的 OAuth token,JWT 內容顯示:chatgpt_plan_type = free
這就是為什麼 Telegram 裡明明只問一句話,也會直接被上游 429。換句話說,問題不是「一句話用爆額度」,而是:
Hermes 那條 OAuth session 根本不是可用的 Plus/Codex 身分
上游直接把那筆 session 視為 free path
為什麼會這樣
這次排查後發現,系統其實有兩套不同來源的憑證:- ~/.codex/auth.json
這是 Codex CLI 自己的登入狀態。我的這份內容解出來是:
plan_type = plus
2. ~/AppData/Local/hermes/auth.json
這是 Hermes 自己維護的 OpenAI Codex OAuth 狀態。當時 Hermes 裡那份 token 解出來卻是:plan_type = free
也就是說:Codex CLI 是 Plus
Hermes OAuth 卻不是 Plus
所以 Telegram Gateway 走 Hermes 那套時,當然就一直 429。真正修好的方法
步驟 1:清掉 Hermes 裡錯的 free Codex 憑證
先備份,再移除已經被判定 free / usage_limit_reached 的 openai-codex credential。步驟 2:不要再用錯的 device-code session
這次最重要的觀察是:hermes auth add openai-codex
走的是 Hermes 自己的 device-code 流程。但 ~/.codex/auth.json 那份其實已經是可用的 Plus token。
步驟 3:把 ~/.codex/auth.json 的 Plus token 匯入 Hermes auth store
也就是讓 Hermes 不再用那條 free 的 OAuth session,而改吃 Codex CLI 那份已確認是 plus 的 token。修完後再驗證 Hermes credential pool,確認只剩一筆:
openai-codex
#1 device_code oauth device_code
而且解 token 後是:plan_type = plus
步驟 4:重啟 Gateway
讓 Telegram Gateway 重新載入新的 Codex credential pool。Telegram 最後怎麼用
本地 Qwen
/qwen
或/qwenmtp
Codex
/codex
注意:/codex 要單獨一則訊息送出,不要寫成:/codex 你目前什麼模型
因為 Hermes 會把後面那串當成模型名稱的一部分,然後報:Error: Model names cannot contain spaces.
正確做法是兩則:/codex
等看到切換成功後,再送:你目前什麼模型?
我最後保留的策略
我沒有把全域預設改成 Codex,而是保留:全域預設:本地 Qwen MTP
需要雲端時:手動 /codex
這樣比較穩,因為:/new 後不會掉回雲端
本地模型一定可用
Codex 有狀況時不會拖垮 Telegram 整體可用性
啟動腳本最後怎麼改
我的 start-all.bat 最後改成這種思路:只重啟 llama-server
Hermes Gateway 如果已在跑,就不要重複啟動
Hermes Codex proxy 如果 8645 沒開,再補開
保留 warmup 流程
重點不是腳本長怎樣,而是避免每次都:把 Gateway 砍掉重開
把正常的 proxy 狀態搞亂
造成舊 session 和新 session 混在一起
驗證清單
如果你也要照這樣配,最後至少要確認這些:本地模型
curl.exe -H "Authorization: Bearer 123" http://127.0.0.1:8080/v1/models
要能看到你的本地 gguf 模型。Hermes Gateway
hermes gateway status
要顯示 running。Hermes Proxy
curl.exe -i -H "Authorization: Bearer sk-unused" http://127.0.0.1:8645/health
curl.exe -i -H "Authorization: Bearer sk-unused" http://127.0.0.1:8645/v1/models
要成功。Codex 身分不是 free
這點超重要。不是只看「logged in」,而是要確認實際 token 對應的帳號身分不是 free。如果 Telegram 裡還是出現:
The usage limit has been reached
plan_type: free
那就代表 Hermes 仍然沒吃到正確的 Plus/Codex token。結論
這次最容易踩坑的地方,不是 Hermes 本身能不能接 Codex,而是:Hermes 的 Codex OAuth session
不一定等於
你 Codex CLI / ChatGPT 前端正在用的那個 Plus 帳號
如果你看到:hermes auth status openai-codex 說 logged in
/codex 也顯示切換成功
但實際一問就 429
不要只懷疑額度。先確認那份 token 真的是:
plan_type = plus / pro
這次真正修好的關鍵,就是把 Hermes 從錯的 free session,切回正確的 Plus token。補充
如果你要讓 Telegram 長期穩定使用,我會建議:全域預設留本地 Qwen
/codex 做按需切換
啟動腳本不要每次暴力重開 Gateway
所有修改前先備份 config.yaml、auth.json
這樣真的省很多事。2026/7/10新增內容接gemini pro訂閱額度給herems調用,簡單教學文件,ai整理的
Hermes Agent 接 Gemini Pro 與 OpenAI Codex 訂閱 OAuth:不是 MCP,是本機 OpenAI-compatible Proxy
這篇記錄我這次把 Gemini Pro 訂閱帳號接進 Hermes Agent 的做法。
先講結論:這條路線不是用 Hermes 的 MCP,也不是只讓 Hermes 去呼叫
agyCLI。實際跑通的是:Google OAuth / Antigravity ↓ CLIProxyAPI 本機代理 ↓ http://127.0.0.1:8317/v1 OpenAI-compatible API ↓ Hermes custom provider也就是把 Gemini/Antigravity 的 OAuth 能力包成一個本機
/v1API,Hermes 再把它當成 OpenAI-compatible provider 使用。成功後的狀態
本機跑起來後會有兩個重要服務:
127.0.0.1:8317  CLIProxyAPI,負責 Gemini OAuth proxy
127.0.0.1:8080  原本本機 Qwen / llama-server
Hermes 裡面則可以同時保留兩個 provider:
custom_providers:
  - name: gemini-proxy
    base_url: http://127.0.0.1:8317/v1
    key_env: CLIPROXY_API_KEY
    api_mode: chat_completions
    models:
      gemini-pro-agent:
        context_length: 1048576
      gemini-3.1-pro-low:
        context_length: 1048576
      gemini-3-flash-agent:
        context_length: 1048576
      gemini-3-flash:
        context_length: 1048576
      gemini-3.5-flash-low:
        context_length: 1048576
      gemini-3.5-flash-extra-low:
        context_length: 1048576

  - name: qwen-local
    base_url: http://127.0.0.1:8080/v1
    api_mode: chat_completions
    models:
      Qwopus3.6-27B-v2-MTP-Q4_K_M.gguf:
        context_length: 131072
目前我自己的 Hermes 主模型可以這樣設:
model:
  provider: custom:gemini-proxy
  default: gemini-3.5-flash-extra-low
  context_length: 1048576
如果要改回 Gemini Pro agent,也可以改成:
model:
  provider: custom:gemini-proxy
  default: gemini-pro-agent
  context_length: 1048576
安裝 CLIProxyAPI
我把它放在 Hermes 目錄底下:
mkdir -p ~/.hermes/cli-proxy/bin
cd ~/.hermes/cli-proxy
下載 CLIProxyAPI Linux amd64 release,例如我這次用的是:
CLIProxyAPI_7.2.58_linux_amd64.tar.gz解開後會有:
~/.hermes/cli-proxy/bin/cli-proxy-api
~/.hermes/cli-proxy/bin/config.example.yaml
確認 binary 可以執行:
chmod +x ~/.hermes/cli-proxy/bin/cli-proxy-api
~/.hermes/cli-proxy/bin/cli-proxy-api --help
建立 proxy config
我用的設定大概是這樣,API key 請自己產生,不要貼真值:
host: 127.0.0.1
port: 8317
api_keys:
  - "replace-with-your-local-random-key"
auth_dir: /home/YOUR_USER/.hermes/cli-proxy/auth
log_dir: /home/YOUR_USER/.hermes/cli-proxy/logs
static_dir: /home/YOUR_USER/.hermes/cli-proxy/static
我另外把 key 放進 Hermes 的
.env:CLIPROXY_API_KEY=replace-with-your-local-random-key這樣 Hermes config 裡就可以用:
key_env: CLIPROXY_API_KEY不要把 proxy API key 寫進分享文、git repo 或截圖。
Google OAuth
這一步是關鍵。
CLIProxyAPI 啟動後,照它提供的 login/OAuth flow 讓瀏覽器完成 Google 授權。授權成功後,
auth_dir裡會出現類似:~/.hermes/cli-proxy/auth/antigravity-<your-google-account>.json這個檔案是 OAuth 憑證,權限建議至少設成:
chmod 600 ~/.hermes/cli-proxy/auth/*.json我這台是透過遠端機器操作,所以 OAuth 頁面需要用 SSH tunnel 或可以開瀏覽器的方式完成。這也是很多人會卡住的地方:不是 Hermes 不能接,而是 OAuth callback 沒有正確回到本機 proxy。
用 PM2 常駐 CLIProxyAPI
我的
pm2不在系統 PATH 裡,所以用完整路徑:~/.hermes/node/bin/pm2 start ~/.hermes/cli-proxy/bin/cli-proxy-api \ --name cli-proxy-api \ -- -config ~/.hermes/cli-proxy/config.yaml ~/.hermes/node/bin/pm2 save確認它有活著:
~/.hermes/node/bin/pm2 status
ss -ltnp | grep 8317
應該看到:
cli-proxy-api  online
127.0.0.1:8317 LISTEN
測試 proxy
先測
/v1/models:curl -s http://127.0.0.1:8317/v1/models \ -H "Authorization: Bearer $CLIPROXY_API_KEY"我這邊能看到的模型包含:
gemini-pro-agent
gemini-3.1-pro-low
gemini-3-flash-agent
gemini-3-flash
gemini-3.5-flash-low
gemini-3.5-flash-extra-low
再測 chat completions:
curl -s http://127.0.0.1:8317/v1/chat/completions \
  -H "Authorization: Bearer $CLIPROXY_API_KEY" \
  -H "Content-Type: application/json" \
  -d '{
    "model": "gemini-pro-agent",
    "messages": [
      {"role": "user", "content": "Reply with exactly: Gemini proxy confirmed"}
    ]
  }'
能正常回覆後,再接 Hermes。
Hermes 設定 custom provider
在 Hermes 的
config.yaml加上:custom_providers: - name: gemini-proxy base_url: http://127.0.0.1:8317/v1 key_env: CLIPROXY_API_KEY api_mode: chat_completions models: gemini-pro-agent: context_length: 1048576 gemini-3.1-pro-low: context_length: 1048576 gemini-3-flash-agent: context_length: 1048576 gemini-3-flash: context_length: 1048576 gemini-3.5-flash-low: context_length: 1048576 gemini-3.5-flash-extra-low: context_length: 1048576主模型可以設:
model:
  provider: custom:gemini-proxy
  default: gemini-pro-agent
  context_length: 1048576
或改成比較省的:
model:
  provider: custom:gemini-proxy
  default: gemini-3.5-flash-extra-low
  context_length: 1048576
改完後重啟 Hermes gateway:
systemctl --user restart hermes-gateway
systemctl --user is-active hermes-gateway
Hermes 裡切換模型
在 Telegram / Hermes bot 裡可以用:
/model custom:gemini-proxy:gemini-pro-agent --global
/model custom:gemini-proxy:gemini-3.1-pro-low --global
/model custom:gemini-proxy:gemini-3.5-flash-low --global
/model custom:gemini-proxy:gemini-3.5-flash-extra-low --global
切完建議開新 session:
/new--global是改預設新 session。只想改目前 session,可以用--session。接回原本 8080 Qwen
原本本機 Qwen 也可以保留成另一個 provider:
custom_providers:
  - name: qwen-local
    base_url: http://127.0.0.1:8080/v1
    api_mode: chat_completions
    models:
      Qwopus3.6-27B-v2-MTP-Q4_K_M.gguf:
        context_length: 131072
要切回 Qwen:
/model custom:qwen-local:Qwopus3.6-27B-v2-MTP-Q4_K_M.gguf --global
/new
前提是你的 llama-server / OpenAI-compatible Qwen server 已經在
8080跑著。確認:
ss -ltnp | grep 8080我這次踩到的坑
1. 一開始容易誤會成 MCP
Hermes 本來就可以用 MCP 去調外部工具,
agyCLI 也可以透過 MCP/CLI 被呼叫。但這次要的是「把 Gemini Pro 訂閱 OAuth 當成 Hermes 的模型 provider」,不是「讓 Hermes 呼叫一個工具」。所以正確方向是 OpenAI-compatible local proxy。
簡單判斷:
MCP / CLI tool:模型還是 Hermes 原本的模型,只是多一個工具可以叫
OpenAI-compatible proxy:Gemini 變成 Hermes 的模型本體
2.
agy能跑,不代表 Hermes 直接吃得到 OAuthagy自己有 Google OAuth,但 Hermes 不會自動讀agy的登入狀態。中間需要一層 proxy,把 OAuth 模型包成/v1/chat/completions。這就是 CLIProxyAPI 的角色。
3.
pm2可能不在 PATH我這台不能直接跑:
pm2 status要用:
~/.hermes/node/bin/pm2 status文章或 runbook 建議都寫完整路徑,少一個環境差異。
4. OAuth callback 在遠端機器上會卡
如果是在 SSH server、遠端桌面、無頭環境上跑,Google OAuth 頁面開在你本機瀏覽器,但 callback 要回到遠端機器上的 proxy。
解法通常是:
用 SSH tunnel 把 callback port 轉回遠端
或在遠端機器上直接完成瀏覽器授權
授權成功的判斷不是「網頁看起來過了」,而是
auth_dir裡真的出現 OAuth JSON。5. Hermes provider 名稱要寫完整
切模型時不是只打模型名,而是:
custom:<provider-name>:<model-name>例如:
/model custom:gemini-proxy:gemini-pro-agent --global少了
custom:gemini-proxy:這段,Hermes 可能會找不到正確 provider。6. 不要把 key 和 OAuth JSON 放進文章
至少這幾個東西不能貼:
CLIPROXY_API_KEY 真值
~/.hermes/cli-proxy/api_key
~/.hermes/cli-proxy/auth/*.json
任何 Google OAuth token
分享時用 placeholder 就好。
最後驗證
我這次最後驗證了三件事:
1. CLIProxyAPI 在 127.0.0.1:8317 online
2. /v1/models 能列出 Gemini models
3. Hermes 可以用 custom:gemini-proxy 跑 Gemini,也可以切回 custom:qwen-local 的 8080 Qwen
這樣 Hermes 就不是只能 MCP/CLI 調用 Gemini,而是可以把 Gemini Pro OAuth proxy 當成真正的模型 provider 使用。
- 先確認 Hermes 版本
-
-
 T terry 于 将此主题从 LLM讨论区 移至此处
-
T terry 于 将此主题固定
-
-
感謝置頂!!下午折騰了一下成功,成就感很高~特來分享給版主
@CHIA-AN-YANG 是我感谢你,你的帖子一般写的都很认真,质量很高。这个帖子要补充点图片,你再修饰下。
-
@CHIA-AN-YANG 是我感谢你,你的帖子一般写的都很认真,质量很高。这个帖子要补充点图片,你再修饰下。
-
系统 于 取消固定此主题
-
-
本文新增接gemini pro訂閱額度給herems調用的簡單教學,這樣一來有codex,gemini 輪流調用
-